 |
1. Introduction
2.1 Controls list
2. Simple rooms
2.1 Texturing
2.2 Respawn points
2.3 Adding lights
2.3.1.
Adding coronas
2.3.2.
Projected shadows
2.3.3.
Spotlight ray
2.4 Compilation
overview
2.5 Cells and Portals
2.6 Common
compilation errors
2.6.1
Multiple cells
2.6.2
Wrong one cell entities
2.6.3
Same cell on both sides
2.7 Creating doors
2.7.1
Sliding door
2.7.2
Rotating door
2.7.3
Using doors and portals
2.7.4
Possible problems
2.8 Rotating
and moving objects
2.9 Triggers - radial_trigger
2.9.1
Box_trigger
2.9.2
Key_trigger
3. Basic scripting
4. Creating multiplayer map
4.1
Deathmatch and Team Deathmatch
4.1.1
Adding weapons, ammo...
4.2 Capture The Flag
4.3 ShockTroops
4.3.1
Goals
5. Working with Materials /new
5.1
Understanding Materials in WorldStudio /new
5.2 Creating
new Material /new
5.3 Advanced Materials
/new
5.3.1
Breakable glass /new
5.3.2
Water /new
5.4 Decals /new
5.5 Creating
sky /new
6. Outdoor enviroment /new
6.1 Creating
landscape terrain /new
6.2 Fog /new
...
9. Loading screen /new |
version 1.11
update: 20.01.2004
actual version for Download soon! |
Click WS icon  to see images
Player size is 128x64x64 points
Red cross is showing us the position of the camera
Save often
Incremental save shortcut 'CTRL+SHIFT+S'
to see images
Player size is 128x64x64 points
Red cross is showing us the position of the camera
Save often
Incremental save shortcut 'CTRL+SHIFT+S' |
1. Introduction
to the top Here we go, let's
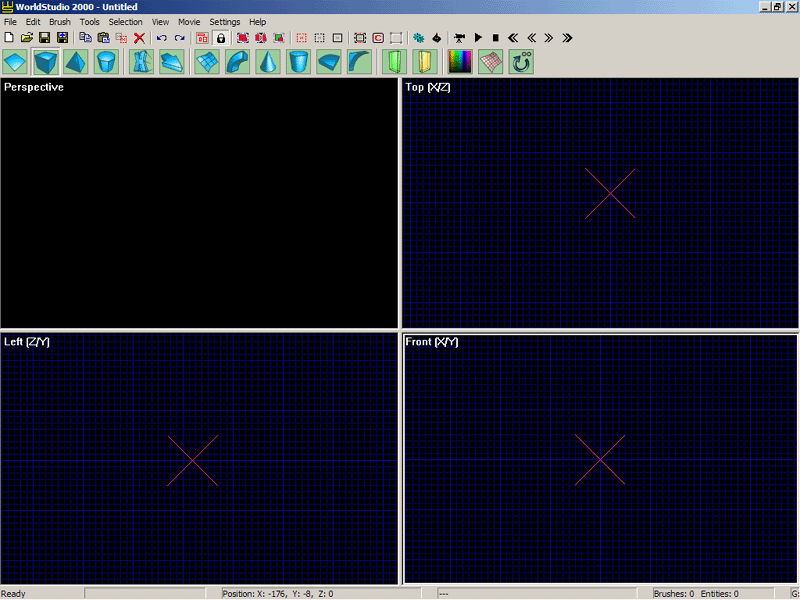
start creating our first map. Start Worldstudio.
You will get standard 4 views. Perspective,
Top, Left and
Front. Along the top you'll see 2 rows of
buttons .
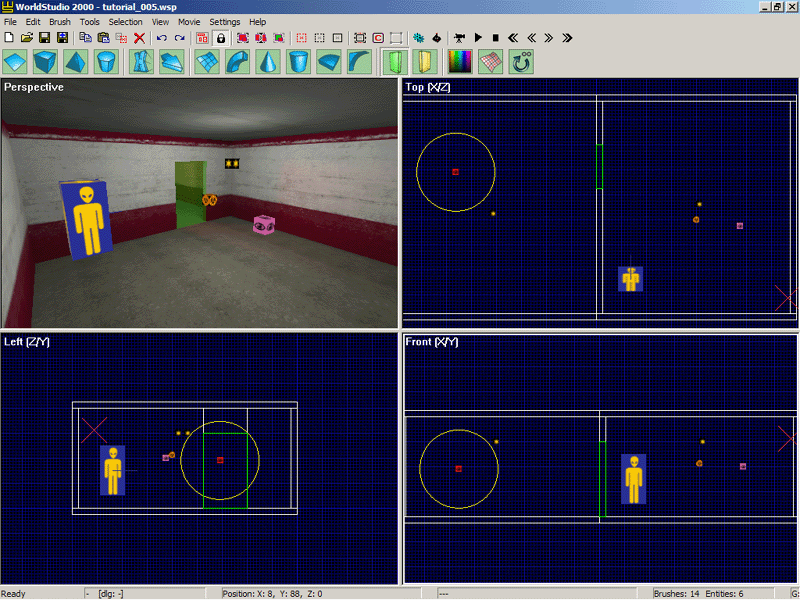
Now take a closer look on 4 views. Standard grid is set to 8 points. Red
cross is showing us the position of the camera in the Perspective
view. Active view is marked with white border. You don't have to
click to activate particular view, just move your mouse over. Player size
is 128x64x64 points. And don't forget to save your progress often. It's
recommended to use Incremental save (CTRL+SHIFT+S).
You can turn on backup-save before compilation feature in Settings
submenu. |
| |
1.1
Controls list to the top
| Selecting |
| CTRL+1 |
Select all |
| Shift+1 |
Hide selected |
| Ctrl+2 |
Invert selection |
| Shift+2 |
Hide unselected |
| Shift+3 |
Unhide all |
| Alt+1 |
Show/hide brushes |
| Alt+2 |
Show/hide entities |
| Alt+3 |
Show/hide portals |
| Alt+4 |
Show/hide occluder |
| Alt+5 |
Show/hide entites icons |
| Alt+7 |
Show/hide links |
| Alt+8 |
Show/hide particle entities |
| Alt+9 |
Show/hide visibility_eye entities |
| Alt+0 |
Show/hide point_light and corona entities |
| Caps lock |
Selection lock |
| Shift+TAB |
Center to selection |
| Windows |
| B |
Brush properties |
| E |
Entity list |
| P |
Prefabricates list |
| T |
Materials window |
| F8 |
Preferences window |
| Editing |
| Shift+Ctrl +B |
Clone |
| Alt+ C |
Collapse |
| Backspace |
Delete selection |
| Alt+N |
Flip Normals |
| K |
Cordon bounds |
| V |
Toggle Vertex Mode |
| R |
Rotation mode |
| S |
Sheer mode |
| [ |
Rotate counterclockwise |
| ] |
Rotate clockwise |
| Alt+H |
Flip horizontaly |
| Alt+V |
Flip verticaly |
| Linking & Grouping |
| Alt+E |
Link (from first selected to all others) |
| Shift+Alt+E |
Chain link (in order of selection) |
| CTRL+Alt+E |
Inverse link |
| Ctrl+E |
Unlink |
| G |
Create group out of selection |
| Alt+G |
Ungroup selected group |
| Textures & Materials |
| I |
Pick Material |
| L |
Texture Lock |
| Insert+Numpad 5 |
Open Material in Notepad (selected with Pick Tool
or in Material Browser) |
| CTRL+Numpad 5 |
Toggle face selection mask |
| UV Coordinates |
| Insert |
Fit texture |
| Numpad 2 |
Shift texture down |
| Numpad 8 |
Shift texture up |
| Numpad 4 |
Shift texture left |
| Numpad 6 |
Shift texture right |
| Numpad 1 |
V Scale texture - |
| Numpad 3 |
V Scale texture+ |
| Numpad 7 |
U Scale texture - |
| Numpad 9 |
U Scale texture+ |
| Numpad+ |
Rotate texture clockwise |
| Numpad - |
Rotate texture counterclockwise |
| Insert+Numpad+ |
Rotate texture clockwise by 90 degrees |
| Insert+Numpad - |
Rotate texture counterclockwise by 90 degrees |
| Numpad / |
U Flip texture |
| Numpad * |
V Flip texture |
| Numpad Del |
Fit texture |
| Object Rotation |
| Q |
Toggle Orbit Camera (rotate around selected object) |
| Up arrow |
Rotate up (while Orbit Camera is on) |
| Down arrow |
Rotate down (while Orbit Camera is on) |
| Left arrow |
Rotate left (while Orbit Camera is on) |
| Right arrow |
Rotate right (while Orbit Camera is on) |
| Viewports and Details |
| Alt+O |
Center world (all views) |
| O |
Center world (current view) |
| CTRL+W |
Cycle render modes in Perspective view |
| W |
Maximize current view |
| F1 |
Maximize Perspective view |
| F2 |
Maximize Top view |
| F3 |
Maximize Left view |
| F4 |
Maximize Front view |
| CTRL + Alt + LMB |
Move render camera into click position |
| F5 |
Increase detail of curves |
| F6 |
Decrease detail of curves |
| Compiling |
| F7 |
Full compilation |
| CTRL+F7 |
Update entities parameters |
| CTRL+Shift+F7 |
Update parameters and positions of entities and parameters
of brushes |
| Files |
| CTRL+N |
New project |
| CTRL+O |
Open project |
| CTRL+S |
Save project |
| CTRL+Shift+S |
Save incremental |
|
SELECTING:
'Shift+LMB' to select brush
'Shift+CTRL+LMB' to multiselect brushes
'Shift+RMB' to select entity
'CTRL+Shift+RMB' to multiselect entities of same kind
'CTRL+Alt+Shift+RMB 'multiselect all entities
'CTRL+Alt+Shift+LMB 'multiselect everything
'Q' to center camera on selected Brush or inside of entity (Orbital
Camera)
'Space' to duplicate selection |
2.
Simple rooms to the top
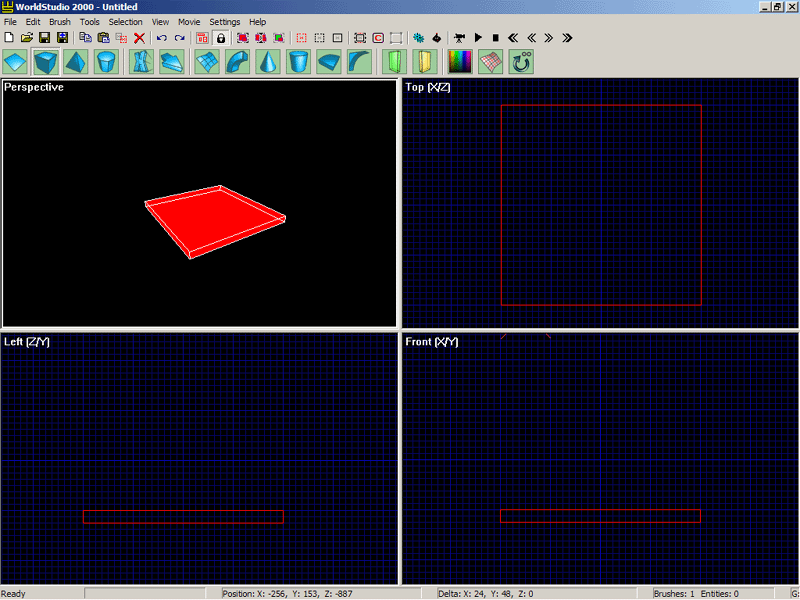
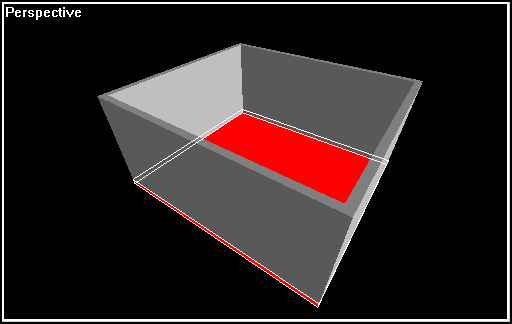
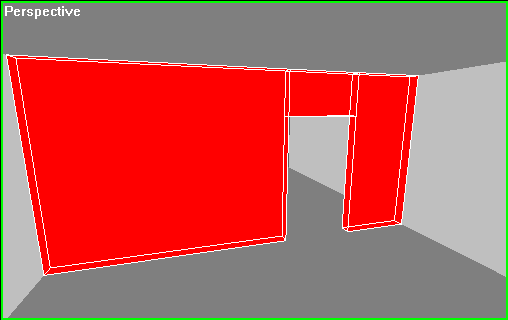
Ok, now we will create simple room. Select Box button
 and in the Top view and drag single brush.
While brush is still selected, you can adjust its thickness or its size
.
Resizing is very simple, just click LMB outside
of a brush or selection and drag your mouse pointer in desired direction.
Now focus on Perspective view. Press 'Q'
to center camera on brush you have created. This is called Orbital
camera. Now you can move the camera around the brush or selection.
You can notice border marking active Perspective
view is now green. You can still change
the distance of camera from selected brush with mouse
scroll. Press 'Q' again to turn off
Orbital camera.
and in the Top view and drag single brush.
While brush is still selected, you can adjust its thickness or its size
.
Resizing is very simple, just click LMB outside
of a brush or selection and drag your mouse pointer in desired direction.
Now focus on Perspective view. Press 'Q'
to center camera on brush you have created. This is called Orbital
camera. Now you can move the camera around the brush or selection.
You can notice border marking active Perspective
view is now green. You can still change
the distance of camera from selected brush with mouse
scroll. Press 'Q' again to turn off
Orbital camera.
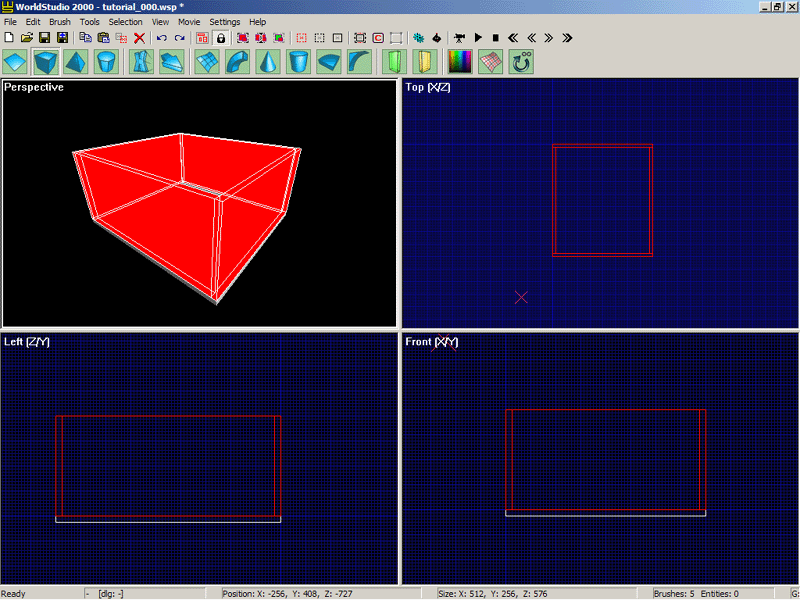
Let's create walls same way we created first brush .
Press 'Esc' to cancel selection if any and
'Shift+LMB' to select our first brush, floor
.
Now Press 'Space' to duplicate selection and
drag new brush on top of our simple room .
We have now closed room, but with no door. Let's create another room.
Press 'Shift+drag LMB' to select everything
except one wall .
Now press 'Space' and drag duplicated room
to the opposite of previously unselected wall .
Move your camera inside of room and select brush which is dividing our
two rooms. Use resizing and duplicating method to create space for future
door . |
| 'CTRL+LMB' to select a face
'CTRL+RMB' to apply material from selected face
'CTRL+doubleclick LMB' to apply material selected in Material Browser
Use numpad arrows to shift, rotate or scroll texture on selected face |
2.1
Texturing to the top
Some basic rules about texturing. You don't have to texture every surface
in Worldstudio. Not textured brushes or faces
will be excluded from map geometry. Let's add some textures. Chaser
and Worldstudio is using Materials,
which are defining all textures parameters like glossiness or breakable
glass.
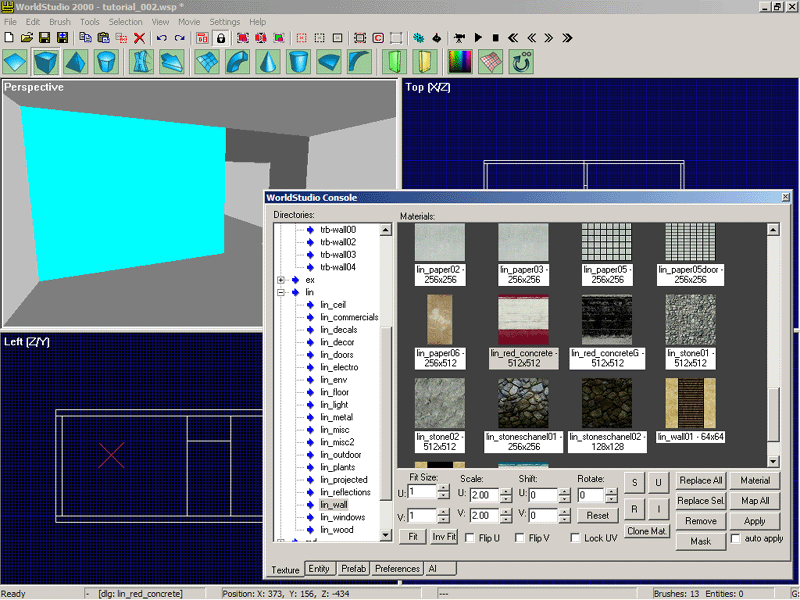
Press 'CTRL+LMB' to pick one of the wall faces.
Now press 'T' to bring up Material
Browser. Select a material, in this
case we will use lin_red_concrete in directory
lin_wall .
Now you have two options how to apply selected material to a selected
face. You can press APPLY button in the bottom
of Material Browser or double-click
with LMB on selected face to apply material. In Material
Browser set Scale to '2.0' in both
axes. You can use Numpad arrows keys to Shift
or Rotate Material\Texture on selected face.
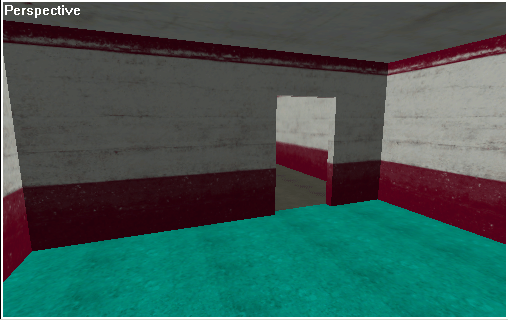
Now it's very easy to apply material to other wall faces. While first
now textured face is selected, use 'CTRL+RMB'
on other faces to apply material with same parameters (like Scale,
Rotation and Shift).
Repeat the procedure tu apply materials on the floor (lin_floor\lin_panel01)
and the ceiling (lin_ceil\lin_ceil2)
. |
| There can be more than one single_player respawn point,
use 'cht_next_rp' cheat to switch between them in the game |
2.2
Respawn points to the top
Let's add respawn point. Bring up Entity list,
find respawn_points \ single_player and add
it into map. You can set initial weapon of
player, class and model_scripts
is defining player's appearance, orientation
sets viewing direction of player after respawning in the map. Optionaly
you can set player health (energy) and armor.
Now map is ready to go. |
| First ambient_light should be named 'WORLD'
There can be more ambient_lights, one in every cell
careful with lights and ambient intensity, to many lights will high
intensity will cause unwanted shiny areas |
2.3
Adding lights to the top
We have now two rooms connected but pretty dark. Let's add some lights.
Make sure you don't have any of brushes selected (red). Press 'E'
to bring up Entity List. Select lights\ambient_light.
Set intensity parameter is set to 0.2
and change its name to 'WORLD'. Notice,
setting color of ambient_light will affect
global lightning. To add selected entity into the world, press 'CTRL+RMB
in one of 2D views. In this case position of ambient_light is not important.
Press 'Esc' to cancel the selection.
Now select lights\point_light in Entity
list. From all of available parameters for us are important only
intensity and range.
Set intensity to 0.8 and range to 800.
Add point_light to the world .
While point_light entity is still selected,
press 'Space' to duplicate the light and move
it into second room. Press 'E' to change parameters
of light. Set range to 900,
intensity to 0.7
and color to '128, 0,
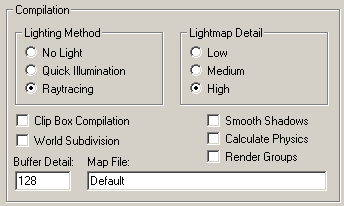
0, 255'. Press 'F8' to bring up map
preferences and set Lightning Method to Raytracing
and Lightmap Detail to High
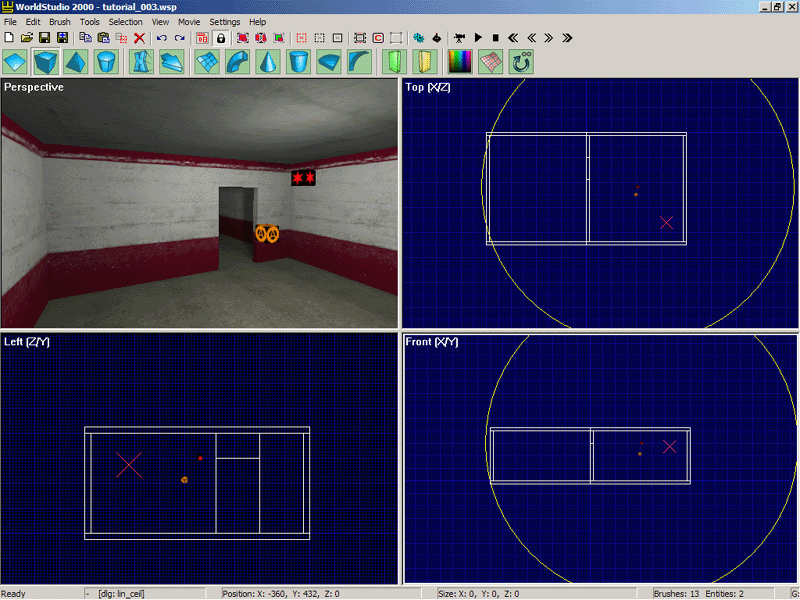
. You can press 'F7' to compile the
map (or click  ).
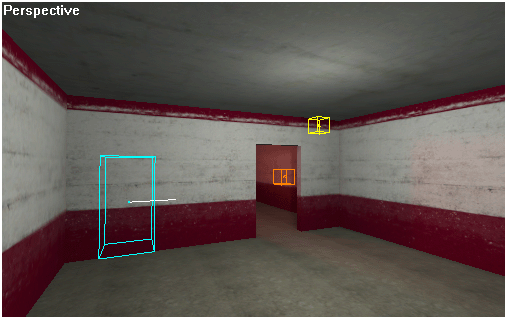
Now you can see how is map lit .
Cycle through rendering modes in Perspective view
with 'CTRL+W' (textured w\ lights, wireframe,
textured w\o lights). ).
Now you can see how is map lit .
Cycle through rendering modes in Perspective view
with 'CTRL+W' (textured w\ lights, wireframe,
textured w\o lights). |
| corona linked with point_light inherits
point_light's color
|
2.3.1
Adding coronas to the top
So we have some lit rooms, but no real visible light sources. Use Prefab
 (light_body in Tutorial directory) which will
represent light source itself. Place it above the entrance to the second
room. Now add new point_light entity (intensity
= 0.8; color = 255, 255, 255, 255; range
= 200), put it very near to the brush representing the light. Now duplicate
point_light and place it in the center of
light brush. While still selected second light you just duplicated, bring
up Entity list window and select lights
/ corona. Worldstudio will ask if you want to convert selected
entity into corona. Yes, you want. Now link
corona to the point_light.
Now corona gets the same color as point_light
has and ignores its own color parameter. This is important if you want
to create dynamic light (when you turn the light off, corona should be
off too...). Now about coronas parameters. Set intensity
to 0.9 (how bright the corona will be), min_size
to 32 and max_size
to 48 (size of the corona when you are near
to it or far from it), start_range to 0,
end_range to 8192,
and most important, choose the texture of
the corona (\common\corona-tech.tga). We need
to link light brush with point_light entity
too. Texture used on the light brush will now be colored with same color
as light emits. If you want green light, it's not necessary to change
the material, it will take the color from point_light
color setting.
(light_body in Tutorial directory) which will
represent light source itself. Place it above the entrance to the second
room. Now add new point_light entity (intensity
= 0.8; color = 255, 255, 255, 255; range
= 200), put it very near to the brush representing the light. Now duplicate
point_light and place it in the center of
light brush. While still selected second light you just duplicated, bring
up Entity list window and select lights
/ corona. Worldstudio will ask if you want to convert selected
entity into corona. Yes, you want. Now link
corona to the point_light.
Now corona gets the same color as point_light
has and ignores its own color parameter. This is important if you want
to create dynamic light (when you turn the light off, corona should be
off too...). Now about coronas parameters. Set intensity
to 0.9 (how bright the corona will be), min_size
to 32 and max_size
to 48 (size of the corona when you are near
to it or far from it), start_range to 0,
end_range to 8192,
and most important, choose the texture of
the corona (\common\corona-tech.tga). We need
to link light brush with point_light entity
too. Texture used on the light brush will now be colored with same color
as light emits. If you want green light, it's not necessary to change
the material, it will take the color from point_light
color setting.
Only last thing remains, to set brush parameters. Select brush representing
the light and press 'B'. Mark parameter Corona
No Clip, so the corona is visible even when it's inside the brush.
Mark No Shadows parameter and optionaly See
Through parameter. This is rather important, eyes cannot see the
corona entity inside of the brush (or any other entity hidden behind or
inside of some obstacle. So you can set brush to be like transparent,
eye can see behind such brush or you can link particular entity to eye
in the cell it belongs to (in this case corona
entity) This is rather recomended than making See
through brushes (it will drag out compilation). Be careful, avoid
this parameter to be set within brushes which separates cells, eg. walls
or floor and ceiling and so. You will get Multiple
cells error in most cases.
Select whole light including point_light and
corona entities, duplicate them and place
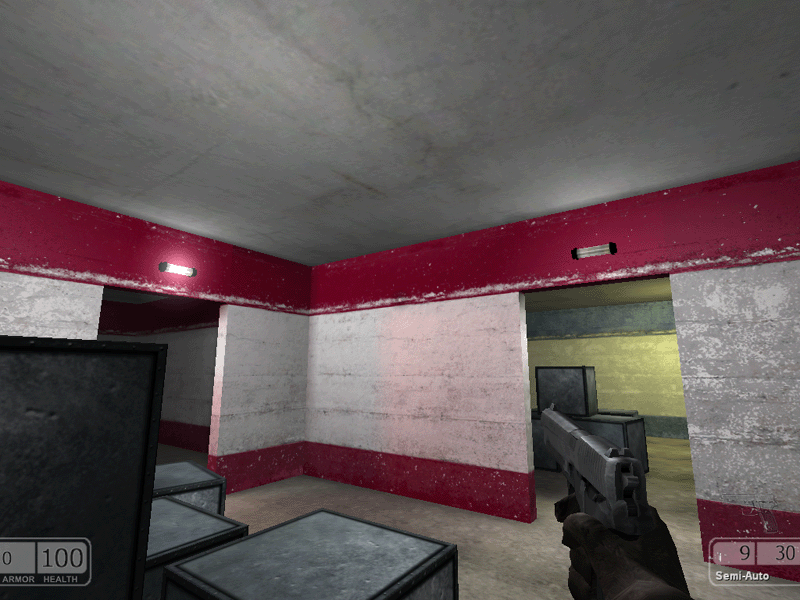
above another passage to the third room. Compile the map and see how the
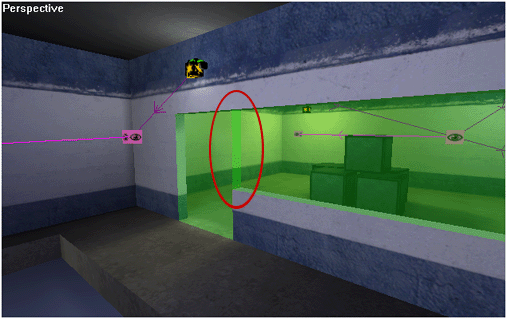
lights look. Can you see the difference? Second light has no corona,
because we forgot to link the corona
with visibility_eye in this cell .
|
| It's recommended to link spotlight with target_position |
2.3.2
Projected shadows to the top
It's very easy ho have some projected shadows to add some atmosphear.
Add another point_light entity near the ceiling,
and add helpers \ target_position entity directly
below, near to the floor. 'Alt+E' to link
point_light -> target_position. Now let's
change common point_light into spotlight.
Set parameter spotlight_enable = TRUE,
surprisingly. You can see the change in any of views. Point_light
has no range circle but a conus, so you can see how big the spot is and
where it will be. Now choose spotlight_texture
with double-click and select lin_projected\lin_ventilation01.tga.
This is texture of the shadow of a ventilator, ventilators mostly rotates,
so set spotlight_rotation = 60. |
| |
2.3.3
Spotlight Ray to the top
To create ray of light you have to use entity spotlight_ray
in lights dir. Just place it near brush representing light, or better
inside of it a little (in that case, don't to link it with visibility_eye,
else it will not appear in the map, eyes wouldn't see it). Add another
target_position and link spotlight_ray
with that target_position. This link shows
us direction of spotlight ray and its length. Only last thing remains,
setting spotlight_ray parameters. Chose the
texture, which is RGB (no alpha channel, see lin_lights/lin_beam01.tga).
Min_intensity is the brightness of ray when
you are at start_range or closer and Max_intensity
is when you are at end_range or beyond. So
with combination of this four parameters you can have a spotlight ray
which will fade out as you will approach and fade in as you will move
away from it. Color setting has same rule as corona,
if spotlight_ray is linked with point_light,
it will inherit its color. |
| 'F7' is full compilation
'CTRL+F7' only updates entities parameter (with exceptions)
'CTRL+Shift+F7' updates entities parameters AND positions and brush
parameters
'F10' starts map in Chaser |
2.4
Compilation overview to the top
There are 3 methods of compilation in Worldstudio.
By pressing 'F7' key you will start full
compilation of the world\map. That means it will compile the geometry
of the map, entities positions and parameters and at last the lights and
shadows. But not always it's necessary to compile whole map just because
we have changed some parameter of some entity or brush. To update existing
entities parameters, you can use update compilation
by pressing 'CTRL+F7'. Third method is used
when you want to update entities parameters and POSITIONS or you have
added new entities to the world. Press 'CTRL+SHIFT+F7'.
Both methods exludes changes in parameters of lights
and ambient light like color,
intensity or range
and any changes concerning cells and eyes
entities. We'll talk about cells and eyes later.
Let's update single_player respawn_point into
world. Press 'CTRL+SHIFT+F7'. Close compilation
summary window and run the game by pressing 'F10'. |
| Cell is defined by at least one or by a
group of linked visibility_eyes entities.
Portal is only way where player or bot can pass into another cell.
Portal has no thickness, it's just a plane in the middle of a portal
brush you see in worldstudio editor, keep that in mind when creating portals |
2.5
Cells and Portals to the top
Cloak NT engine is using portal
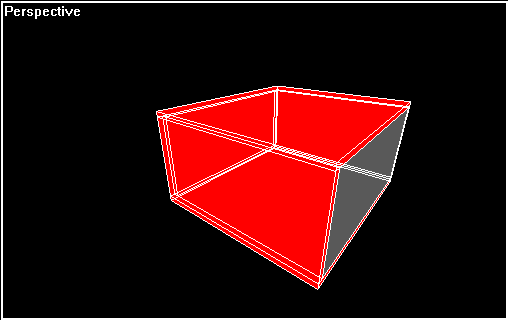
technology. That means world is divided into cells. Every cell is defined
by eyes entities in it and cell borders are
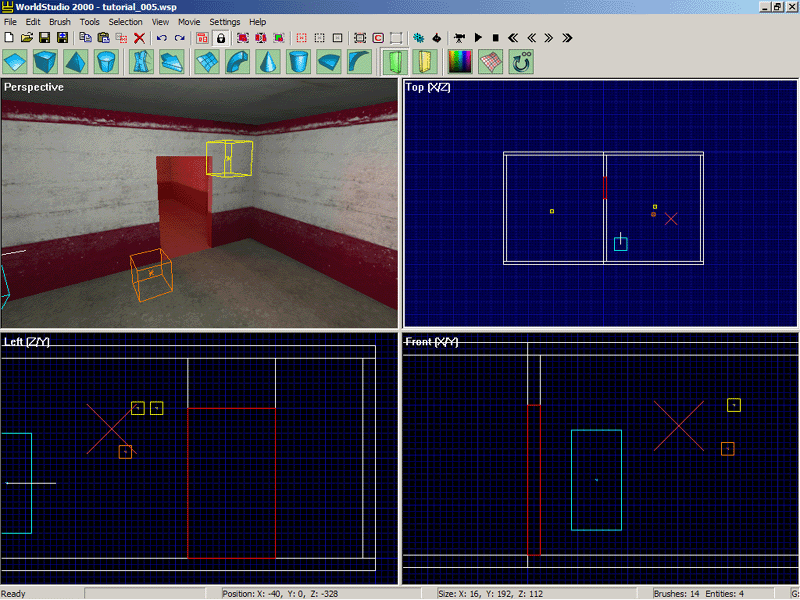
defined with brushes and portals. Portals
are only way where player\s or bot\s can pass
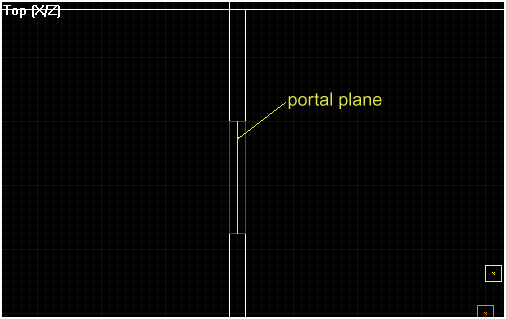
to another cell. Portals have no thickness, it's just a plane in the middle
of a portal brush you see in worldstudio editor, keep that in mind when
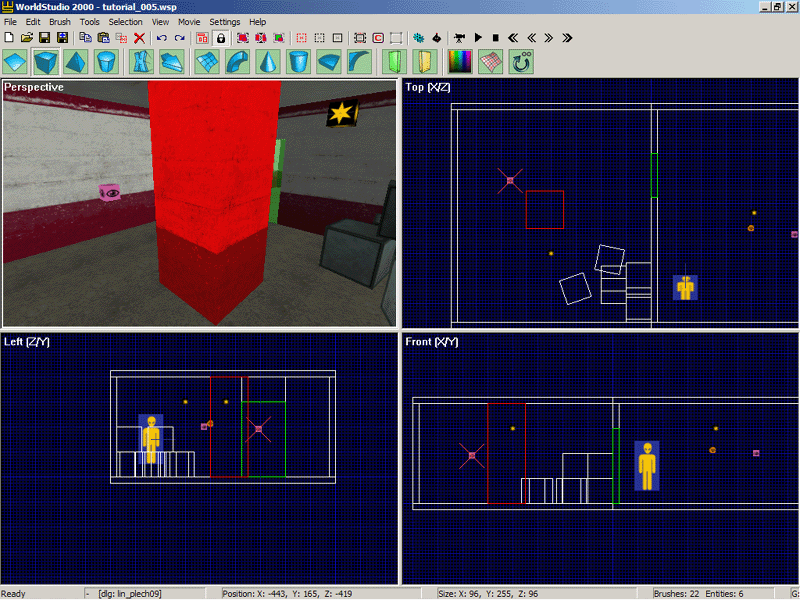
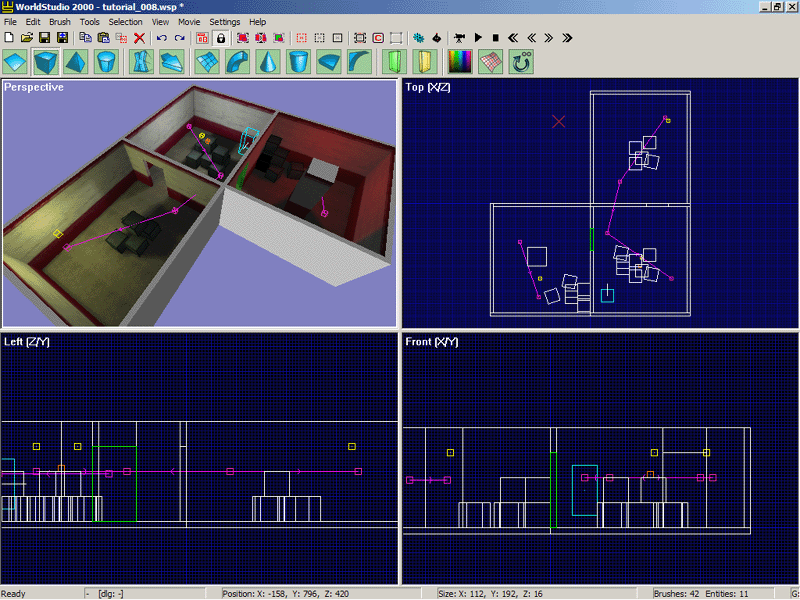
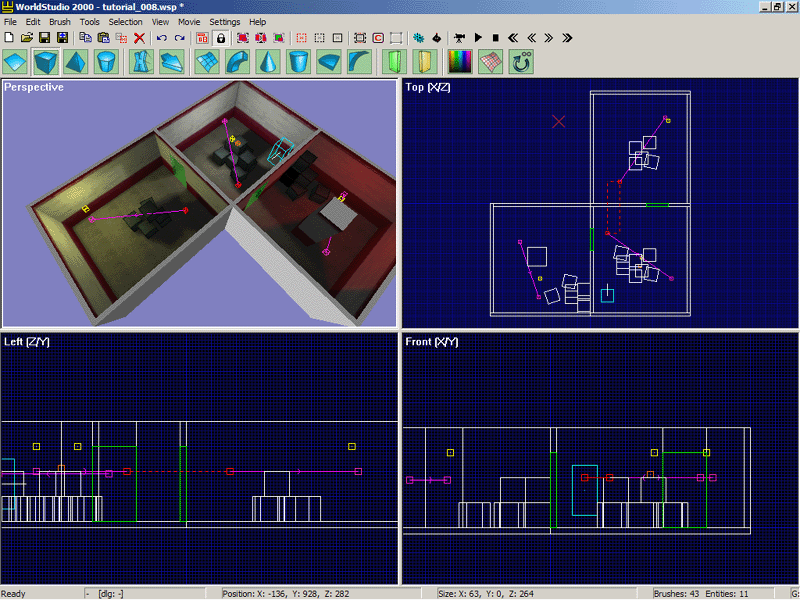
creating them. See screenshot .
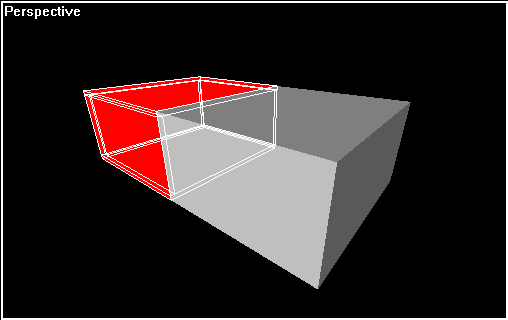
Try to avoid creating portals shaped as box. There can be two or more
portals in one level touching each other. See screenshot .
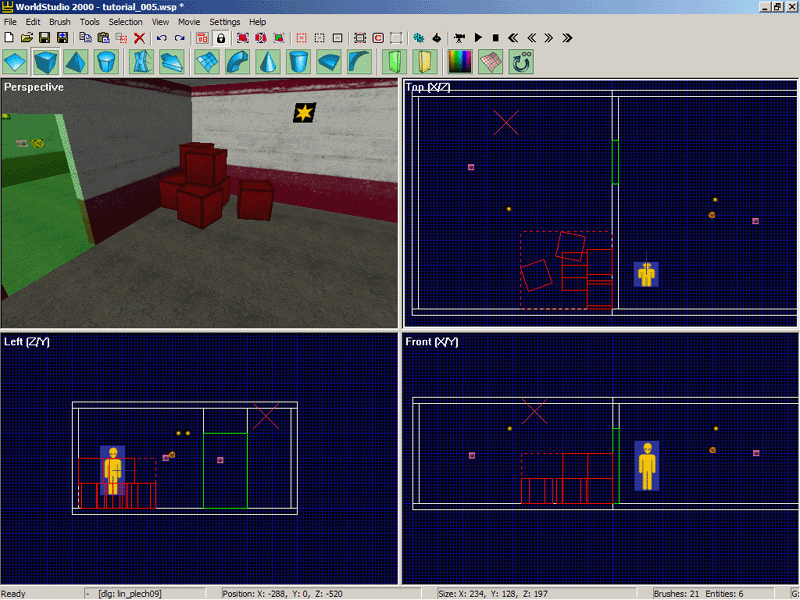
First, we will add some boxes into second room. Create one with box
tool
with sizes of all sides 64 points. Apply the material lin_metal\lin_plech09
on one side of the box and than press 'Insert'
to fit the material to size of the box. Apply to other 5 sides of the
box as you did before when texturing walls, use 'Insert'
if material is shifted. Duplicate textured box few times and place them
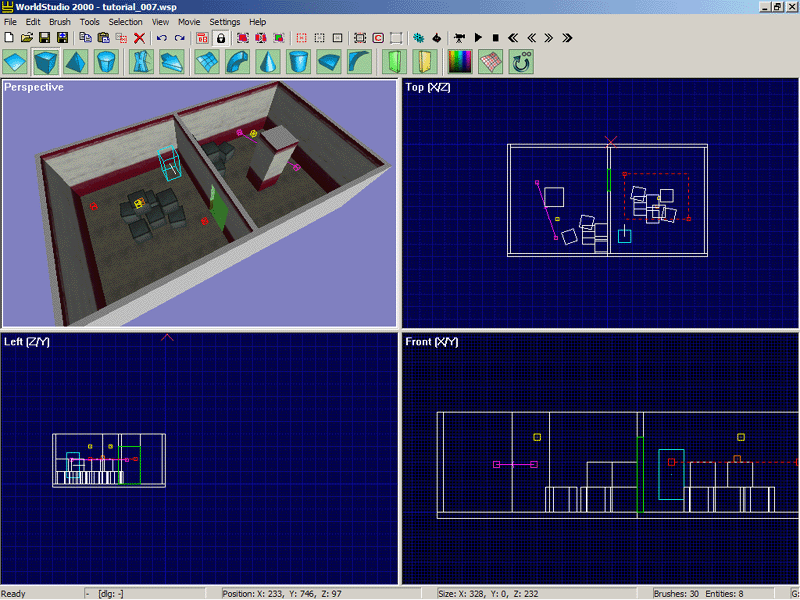
as in the screenshot .
Compile the world with 'F7' and run the game.
Switch to Wireframe mode by pressing 'F6'
and observe around. You are able to see every brush in the map, even boxes
behind the wall in the second room of course.
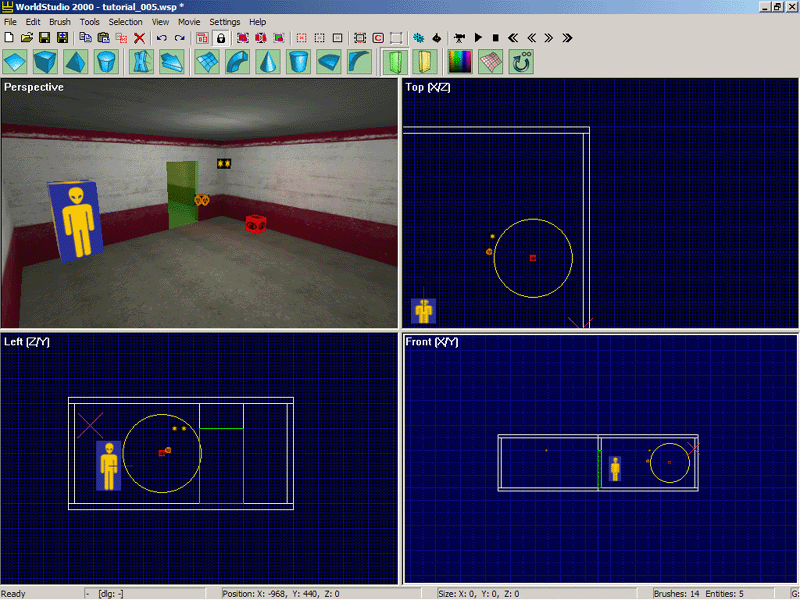
Here comes important part. We will create cells in our map. Select Portal
button  in main button row. Drag a portal same way you have created other brushes,
place it exactly at the empty space in the wall, same thickness as the
wall is .
Make sure it contacts every side of the passage to another room. Very
important rule is, there can NOT exist a portal
without eyes on both his sides. Let's add eyes entities. Bring
up Entity list by pressing 'E'
and select helpers\visibility_eye. Place it
in the first room with 'CTRL+RMB', make sure
it's inside the room, not inside of any brush or portal .
Now duplicate the visibility_eye entity and
move it to the second room. Both sides of
the portal now has defined its cells .
in main button row. Drag a portal same way you have created other brushes,
place it exactly at the empty space in the wall, same thickness as the
wall is .
Make sure it contacts every side of the passage to another room. Very
important rule is, there can NOT exist a portal
without eyes on both his sides. Let's add eyes entities. Bring
up Entity list by pressing 'E'
and select helpers\visibility_eye. Place it
in the first room with 'CTRL+RMB', make sure
it's inside the room, not inside of any brush or portal .
Now duplicate the visibility_eye entity and
move it to the second room. Both sides of
the portal now has defined its cells .
Now in Preferences window mark
World Subdivision. Now compile the world with 'F7'.
You can notice summary after the compilation is a bit more filled with
information. For us is now important line with '2 Cell(s) created'.
Run the game, Notice while you're in first room, boxes from second room
disappears. This is called clipping, Cloak NT engine
is clipping out the geometry you really can't see at the moment. Using
this feature you can create really complex enviroments.
Now we will add some obstacle for the visibility_eye.
Big massive pillar is good. Create one in the second room so it is between
the visibility_eye and the boxes .
Compile the map. You may notice all boxes (if you done everything exactly)
are not in the room. That's because visibility_eye
cannot see (trace) them through the
pillar during compilation. Select particular eye and press 'Q'
while Perspective view is active. Camera jumps
into the selected entity and you can observe around with LMB to see what
is (or not) visible for selected eye. To make boxes visible in this cell,
we have to add another visibility eye into this cell. Add another eye
entity into this room so it can see the boxes and link
both eyes within this room by pressing 'ALT+E'.
To unlink selected entities use shortcut 'CTRL+E'.
Remember, cell is defined by its eye\group of
linked visibility_eyes, every
other unlinked visibility_eye creates another
cell. There can not exist two cells on one side of the portal.
If you forget to link two or more visibility_eyes
on one side of the portal, you will get compilation error.
|
| |
2.6
Common compilation errors to the
top
2.6.1
Multiple cells
Add some more boxes into the first room and also add another visibility_eye
.
Now we have cell with two unlinked eye. Try
to compile the map by pressing 'F7'. We will
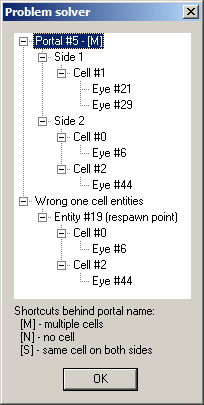
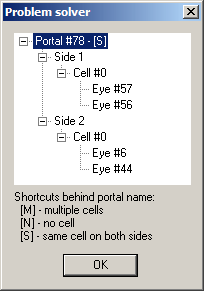
get several compilation errors. Problem solver
will appear, very helpfull tool (Alt+P). Take
a look at the screenshot
(entity and brush ID numbers may differ) and let's solve problems.
In first line we have common Multiple Cells
error (marked with M). Problem
solver shows us, which of these multiple cells are on which side
of a particular portal. List of all cells on both sides of portal follows.
You can select every entity or portal with double-click in the list in
Problem solver. |
| |
2.6.2
Wrong one cell entities to the
top
Another common problem is, when Worldstudio
cannot determine to which cell certain entities belongs. In this case
it cannot match single_player reswpawn point
into the particular cell. Solution is to link single_player
entity to appropriate cell, if everything is in order, or in this case,
link visibility_eyes into one cell. Do so
now. Both problems are solved now. (Sometimes it will be necessary to
link some entities with visibility_eyes, "lebo nepresnosti vo vypoctoch"). |
| |
2.6.3
Same cell on both sides to the
top
Create another room with door next to first one. Add two eyes in it,
some light and if you want few boxes. Link those new eyes with other two
already linked in first room, so it create a linked chain .
There are two options how to link multiple eyes. Chain
link (Shift+Alt+E) or All-to-One
link (Alt+E). There is a rule, every
eye / entity will be linked to the first one selected. Choose your method,
both works same way.
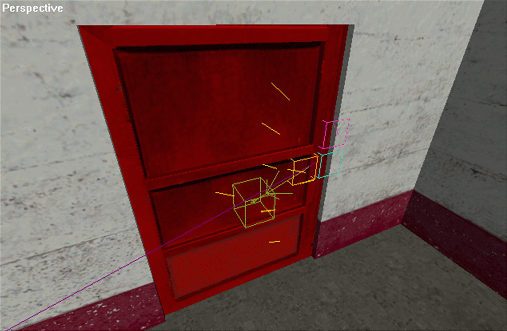
This cells now consist of two rooms. Now let's change this two rooms into
separate cells. Add a portal into door space like before. Try to compile
the map (F7). You will get Same
cell on both sides error .
Solution is easy, Problem solver will warn
you, so you should find easily which portal and which eyes / cells causes
this. Just unlink crossing links and that's it . |
Every entity
(and brush) related to basic_door (target_position,
trigger and pivot)
have to be linked in direction from basic_door
entity |
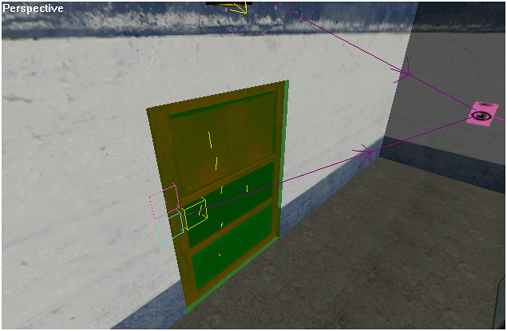
2.7
Creating doors to the top
2.7.1
Sliding doors
Let's create some doors. Create brushes which will represent doors itself.
Or use
(door in Tutorial directory). Now add entity
doors / basic_door. You can set open_speed
and close_speed to 100 (points per second).
Create another entity (helpers / target_position)
and place them as in the screenshot .
Link basic_door with target_position.
Direction of the link is important, or door won't open. Link must point
from door entity to position entity. With
this link we have set how far door will move when activated and in which
direction. Try to place target_position in
different place and door will move in that direction as the link shows.
Now select basic_door entity again and than
brushes representing door (all of them). Link them same way (from basic_door
entity to brushes).
Now we need trigger which will activate door.
Place near by triggers / radial_trigger (not
very high, so it can be reachable by player, recommended is 64 points
high above the floor) and link basic_door
entity onto it. Still follow the rule, every entity (and brush) related
to basic_door (target_position,
trigger and pivot)
have to be linked in direction from basic_door
entity.
Now set up radial_trigger. You can see this
entity has similar circle around it as point_lights
have. This is showing us range where radial_trigger
can be activated, set it to 128. Next important parameter is activate_count,
by default set to 1. This trigger can be activated
only once. Set it to 0 (zero) for infinite activate count. Sometimes you
may find yourself in situation you will need a trigger with very big activation
range, but it will reach places behind the walls, or floors and ceilings
(eg. next floor). To prevent this it you can set one_cell_trigger
= TRUE. Anyways in this case it's ok, we need this trigger on both
sides of door (in both cells). Compile the map and test the door. |
| |
2.7.2
Rotating doors to the top
Duplicate our recently created door including basic_door,
target_position and radial_trigger
entity and move them in the place of second pasage. In other words, rotating
doors are basicly same as sliding doors, just with few changes. Let's
do it.
To create rotating doors we need to set axis of rotation. Move linked
target_position entity exactly above basic_door
enity. We still have sliding doors here, to change them into rotating
doors you have to add new entity called Pivot (helpers
directory). Create link basic_door -> pivot
and place it next to the basic_door entity
so link shows the zero position (closed) of the door. Now just move basic_door,
target_position and pivot
entities in the position like on this screenshot .
In basic_door entity properties you can change open_angle (90 by default)
and another important parameter, open_opposite.
If this is set to TRUE, door will always open opposite the player. If
set to FALSE, door will open in the direction of open_angle
(eg. 90 or -90). Compile and test the map. |
| |
2.7.3
Using doors and portals to the
top
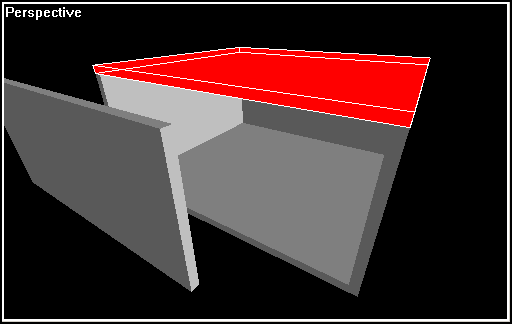
This is very important. If you observe around in game in wireframe
mode ('F6'), you will realize even
door are closed, you can still see what's behind. You can prevent this
if you link basic_door -> PORTAL. Cloak
NT engine will from now cut out everything behind the door untill the
player opens them. You can save some framerate with this method in some
more complex maps. Compile the map and see how it works |
| |
2.7.4
Possible problems to the top
Quite common is a compilation error Wrong entities.
Sometimes Worldstudio cannot determine to which cell particular entity
belongs. Solution is easy, just link that entity to the visibility_eye
in that cell.
Other a bit bigger problem comes out with rotating doors. If door will
open in direction so they cross the portal, some or all brushes of the
door may dissapear (because they belong to the another cell, second cell
behind the portal couldn't detect them because of portal.) (
- door brushes are completely covered with portal, visibility_eyes
in this cell cannot detect these brushes behind the portal). To solve
this, select all brushes of door, bring up Brush
Properties window ('B') and mark Always
Visible. |
| |
2.8
Rotating and moving objects to
the top
To create
rotating objects is very easy. Select entity Rotation
in Transform directory and place it somwhere
in the map. Duplice one box and place it under Rotation entity and link
them in direction from entity to box. Set parameters of rotation, speed
= 60, angle = 360, loop_count
= 0 for infinite rotation and important is to set is_active=TRUE
of course. By default axis of rotations is vertical. If you want to change
axis of rotation, you have to add target_position
entity and link rotation entity with it. To change the direction of rotation,
just set angle in negative numbers. Caution, if you will set angle = 90,
but loop_count = 0, brush (or brusheswill
fully rotate anyway, not only 90 degrees.
To create moving object is a little bit more difficult. You have to create
script, which will control moving of particular brushes, or even some
entities. Let's create same simple example of moving script. Select some
box, or duplicate one, name it for example 'box'
and place in some place you want. Now we will use target_position
again, very usefull entity indeed. Place it somewhere, to create the point
where you want to move our box. Note, box will move to that exact point
with its center. Name that target_position with name 'position1'.
Now about the script. Add new radial_trigger,
somewhere in the corner, so it can be reachable for player. While radial_trigger
still selected, bring up Entity List. There
is a parameter commands, now empty, double-click
it. Script window will appear, with list of all Commands
and Named objects in the map (in alphabetical
order). Find command MOVE and double-click it. It will appear in main
script window. In top row, above main window you can see command's syntax,
very helpfull. In the row below there is what follows in order to complete
command. Next we need to assign what object
are we willing to move. Type box or double-click
in Object names list. Same with destination.
Last two parameters are speed and acceleration, both in points per second,
let's set it at 100 both. Note, every parameter
of a command is separated from other by space, so try to avoid names with
spaces when naming objects or entities. You should end with script like
this:
MOVE box position1
100 100
PreK, now commands parameter in entity properties is filled out with
our script. Close Entity list and compile the map. Box should move, after
activating the radial_trigger. Another option
is to set this trigger to activate automatically, immediately after map
is loaded. For this purpose there is parameter is_active
(by default FALSE). Just set it TRUE, update entities parameters
in the map by pressing 'CTRL+F7' and try it.
|
| |
2.9 Triggers
to the top
There are three types of triggers in Worldstudio/Chaser.
Radial_trigger was actually described above,
so we will continue with other two. Also very usefull is a parameter 'alternative_activation'.
Set TRUE, if you want to occur some situation or action when trigger is
activated not by player himself, but by some moving brush, (eg. when train
passes some area, reaches a gate, which will open automatically). That
brush or brushes just must have marked parameter 'Trigger
Activator'. |
| |
2.9.1
Box_trigger to the top
Box trigger is basicly the same as radial_trigger,
only difference is in activation range. While radial_trigger
has defined its range within a circle, box_trigger's
activation range is defined by a brush of any shape. Brush must be linked
with box_trigger in both directions (first
select entity, than brush and press 'Alt+E'
to link in one direction, than select brush first, than entity, and press
'Alt+E' to link again contrariwise). Box_trigger
was originally designed for situations where circle radius of activation
range wouldn't fit some narrow places, or places with low ceiling with
areas above where it was possible to activate radius of a radial_trigger.
But of course, it's better now to use radial_trigger
with one_cell_trigger = TRUE parameter. |
| To create key_trigger, link it in direction key_trigger
-> brush representing a button (lever). |
2.9.2
Key_trigger to the top
Last but not least is key_trigger, very important,
if you want to add some interactivity. Just create some brush, which will
represent eg. keypad, button or lever, and link key_trigger
onto that brush. Distance from brush to key_trigger
entity set from how far is button reachable. And very usefull is a 'activation_duration'
parameter, which sets how long player must hold a button in order to activate
it (defuse bomb, turn a wheel and so). And also you can set a 'inactivity_time'
if you want to prevent button being activated again immediatelly after
first activation (while player is still holding a 'use
key'. |
| scripts are not case sensitive
every new command starts in a new line
to assure next command will start after previous is finished, we use
! prefix |
3. Basic scripting
to the top
You can move object on more than one destination, for example if you
want to create elevator which will stop on more than one floor. It's easy,
place in the map more target_position entities,
name them with different names (eg. position2, position3 etc.) In order
to add these new positions into script you have to make some changes.
Open script window for trigger which is moving our box and edit it. Add
another two lines in commands script, same as the first one, but change
the destination, you should end with this.
MOVE box position1
100 100
MOVE box position2
100 100
MOVE box position3
100 100
Every new line means new command. Thing is, when script is started, every
next command is executed immediately after previous one, even if first
command wasn't finished. To prevent box moving directly into position3
or in other words, to force script to finish a command and after that
to execute another command, we have to add !
mark in front of MOVE command. Like this
!MOVE
box position1 100 100
!MOVE
box position2 100 100
!MOVE
box position3 100 100
Now box will move to another position once previous one was reached.
You can add a DELAY command for example (in
miliseconds) to hold box for a 1 second in position1.
!MOVE box position1
100 100
DELAY 1000
!MOVE
box position2 100 100
!MOVE box position3
100 100
Now box will move in position1, after reaching
that point it will wait 1 second and then it will continue in position2
and position3 after that.
If you want script to be executed all over during the game, just in the
end add another command RestartScript. When
script is finished, and last command too, script will be executed again.
Example.
!MOVE box position1
100 100
DELAY 1000
!MOVE
box position2 100 100
!MOVE box position3
100 100
!MOVE box position2
100 100
RestartScript
Now box will move back and forth with little stop on position1.
Easy.
In script you can also activate another script, which is written in another
trigger entity with command ACTIVATE trigger_name. |
| |
4. Creating
multiplayer map to the top
4.1
Deathmatch and Team Deathmatch
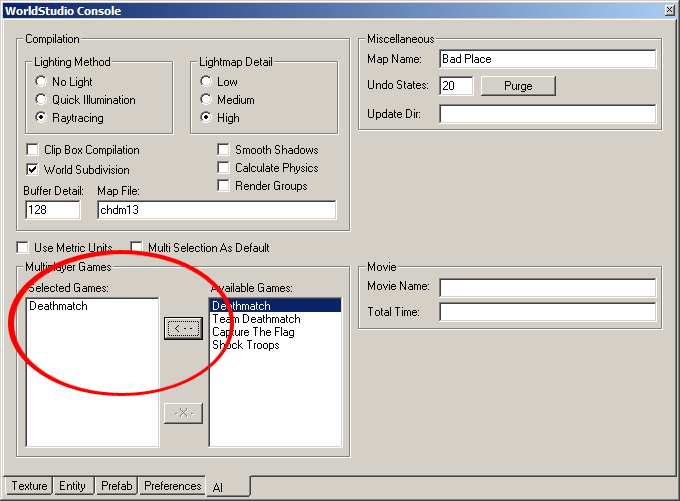
All you need is to assign a flag of a game type in Compilation
preferences window (F8) .
Map compiled with this flag will be available in the maps list when creating
a multiplayer game in Chaser, according to selected game type. (Deathmatch
map when creating deathmatch game etc.)
And of course you need to add some multiplayer respawn_points,
weapons, ammo and armors.
Adding deathmatch respawn_point is same as
adding single_player respawn_point. You can
set initial weapon of player, and if he has nightvision equipped or not.
It's recommended to place enough deathmatch respawin_points
according to the size of map (or for how many number of players is map
defined, eg. for map for 4 players should have at least 8-12 deathmatch
respawn_points). Team Deathmatch uses same
deathmatch respawn_points as deathmatch mode.
Don't forget to keep same settings for every deathmatch respawn_point
eg. every point should have set nightvision googles same. |
| |
4.1.1
Adding weapons, ammo... to the
top
Adding weapons and ammo is very simple, just select desired entity from
the list in weapons directory and place it in the map. Weapons and ammo
clips will fall down to the ground after starting map, so you don't need
to worry about exact placement, but anyway keep them near the floor or
other surfaces. You can set orientation of the weapon in the world if
you prefer or change respawn time. Also you can set world_anim,
that means in what position weapon will appear in the game. All weapons
have default position as world_default (they
simply lie on the ground) and world_02 (leaned
against the wall). Other world_anims are not
recommended.
Ammo entities are easy to distinguish, they have Ammo_
prefix in the name of entity. In square brackets in the end there is highlighted
weapon, which uses that particular ammo. That's it, just keep in mind
one ammo entity is one regular ammo clip in the game, so don't hesitate
to put them enough. Nobody wants to fight using dirty language. All the
same for the armor entities. |
| |
4.2
Capture The Flag to the top
Same way as assigning deathmatch flag you can set CTF flag for the map you're
creating, but you have to use another respawn entities. Should be no problem
to differentiate which ones you need. Again, keep in mind for how many players
per team is your map designed. If you're creating map for 16 people, you
should place 8 blue and 8 red respawn_points.
And don't forget to place Flags. They are in items
directory in Entity list. |
| Click here
to list all available skins for ShockTroops game mode. |
4.3 ShockTroops
to the top
ShockTroops mode uses same team respawn points as CTF mode. Also map
designate as deathmatch or team deathmatch can be also designated as ShockTroops
or CTF map. In ShockTroops and CTF mode game will ignore all items you
have placed in the map (weapons, ammo, armor and in ST mode also flags
of course) and vice versa (no flags and ST goal items in deathmatch mode).
First thing you need to edit in your map is enough respawn_points
of course (red and blue ones). Can be the same as for CTF mode as well.
But ShockTroops mode is a bit more complicated to define. You have to
create file, in which rules are defined for your map. This file is called
'mapname.STRULEZ' and it has to be placed
in maps directory (eg if your mapname is st_badplace.cew,
rules file should be named st_badplace.STRULEZ).
List of all goals follows, copy example.STRULEZ
from examples directory into Maps directory
in Chaser root, rename it your mapname.STRULEZ
and add goals that fits your need. Than change proper parameters if needed.
To define which models and skins are availabe for your ShockTroops map,
set skins in all 8 slots (4 each side) in your .STRULEZ file. |
TeamId = 0
(LAW BREAKERS)
TeamId = 1
(GOVERNMENT FORCES) |
4.3.1
Goals to the top
#Goal
{
TeamId = 0
Type = KillAllOpponents
Params = 0
InitState = Ready
Priority = Main
RankPoints = 0
TeamRankPoints = 400
Text = str_neutralize_gf
//for TeamId = 0
Text = str_elim_lb //for TeamId = 1
} |
Kill all Government Forces
Change TeamId (0 for Law Breakers, 1 for Government Forces)
remove
whole TEXT line, keep only one you need for selected team |
#Goal
{
TeamId = 0
Type = ActivateTrigger
Params = TRIGGER_NAME
InitState = Ready
Priority = Main
Group
= YOUR_GROUP_NAME //optional
RankPoints = 0
TeamRankPoints = 400
Text = GOAL_TEXT_HERE
} |
Activate trigger specified in 'Params'
Change TeamId (0 for law breakers, 1 for government
forces)
Replace (TRIGGER_NAME) with name of trigger
in your map to be activated
There can be more than one trigger set to be activated
for one side. If you want so, create more 'ActivateTrigger' goals
in your *.STRULEZ file, each with particular TRIGGER_NAME and add
Group = YOUR_GROUP_NAME in both goals. If only one trigger has to
be activated, remove whole Group param line. Team will win the game
if all triggers in same group are activated. |
#Goal
{
TeamId = 0
Type = MoveObject
Params = OBJECT_NAME,COUNT,END_ZONE_NAME
InitState = Ready
Priority = Main
RankPoints = 100
Text = GOAL_TEXT_HERE
} |
Change TeamId (0 for law breakers,
1 for government forces)
Steal
object (OBJECT_NAME) or more objects (defined in COUNT) and bring
it (them) back to defined area (END_ZONE_NAME). If only one object
exists, replace COUNT with 1. Replace OBJECT_NAME and END_ZONE_NAME
with your names
Replace with your goal text |
| #Goal
{
TeamId = 0
Type = DestroyObject
Params = OBJECT_NAME,OBJECT_COUNT
InitState = Ready
Priority = Main
RankPoints = 1000
Text = Destroy OBJECT_COUNT
of X objects (remaining %d)
} |
Change TeamId (0 for law breakers,
1 for government forces)
Destroy
object (OBJECT_NAME) or more object (OBJECT_COUNT). Replace OBJECT_NAME
and OBJECT_COUNT as you need
'%d' is a variable, which shows how many objects remain to be destroyed,
you can change this line, but do not change words in brackets. Change
OBJECT_COUNT and number for your needs. |
#Goal
{
TeamId = 0
Type = ReachPoint
Params = AREA_NAME,AREA_COUNT
InitState = Ready
Priority = Main
RankPoints = 100
Text = Occupy at least
AREA_COUNT
areas of 3 (already occupied %d)
} |
Change TeamId (0 for law breakers,
1 for government forces)
Team
has to reach or occupy some area (AREA_NAME) or more areas (number
defined as AREA_COUNT). Replace AREA_NAMEand AREA_COUNT as needed
'%d' is a variable,
which shows how many areas have been reached or occupied already |
|
| Click here
to list all Material Types.
Use unique names when naming your directories, materials and textures! |
5. Working with
Materials /new to
the top
5.1
Understanding Materials in WorldStudio /new
Materials are def files containing information about texture, its glossiness,
material type, shader (if any) and other important information. Let's
take a look on a simple material (eg. lin_red_concrete.mtl
in lin_wall directory (select a material in
Material Browser and press Material button
in the bottom, or press 'i' and pick material
from a textured face in Perspective View)
(note: material selected with Pick tool (or
selected in Material browser) is highlighted in the status line, next
to it, in the square brackets there is a name of a material on currently
selected face):
#Basic
Material Properties
{
AMBIENT_INTENSITY = 1.0;
SELF_ILLUMINATION
= 0, 0, 0;
LIGHT_ILLUMINATION
= FALSE;
DIFFUSE_MAP = lin_wall\lin_red_concrete;
BUMP_MAP = common\default_bump;
BUMP_SCALE = 1.0;
SPECULAR_INTENSITY = 0.0;
SPECULAR_POWER = 1.0;
GLOSS_MAP = lin_wall\lin_red_concreteG;
REFLECTION_MAP
= lin_reflections\lin_default;
REFLECTION_INTENSITY
= 0.5;
LIGHT_REFLECTION
= TRUE;
MATERIAL_TYPE =
concrete;
} |
set color in RGB (0-255) if you want illuminated
material
set 'TRUE' if you want this material to inherit
color of linked point_light
path to the diffuse texture (.tga or
.dds file
Bump mapping and specular lightning is disabled in Chaser.
path to the gloss texture (.tga or
.dds file)
path to the cubemap texture (.tga or
.dds file)
intensity of a reflection (0.0 to 1.0)
set 'TRUE' if you want reflection affected
by level of lightning
sets type of a material (sound hits, steps,
decals) see
list.
|
Basic Material is created automatically every
time you'll start a Worldstudio or when you
press a R button (for Refresh) in Material
Browser. Just keep in mind one important thing.
Name your textures and materials with unique names.
It's recommended to create directory/directories with own name (eg. with
some prefix, I am using prefix lin_ in every
texture, material and directory name) if you want to prevent conflicts
within material and texture names already existing in Chaser, your names
and also new ones created by other map creators. |
| |
5.2
Creating new Material /new
to the top
Creating new Material is the easiest thing in Worldstudio.
Just create your own directory in 'Textures'
dir. Now copy there your texture/textures in .tga
format (24 wo/ alpha channel or 32 bit w/ alpha channel) or in .dds
format. If you're using .dds format (recommended), keep in that directory
also .tga file (with same name as .dds file), Material
browser is not capable of showing .dds
files. All textures must have size in multiplies
of 2. (2, 4, 8, 16, 32, 64, 128, 256, 512, 1024). Of course you can have
texture of a size eg. 128x512. All textures must
be RGB (24 bit) or RGBA (32 bit, with alpha channel) with exception when
creating a outdoor terrain.
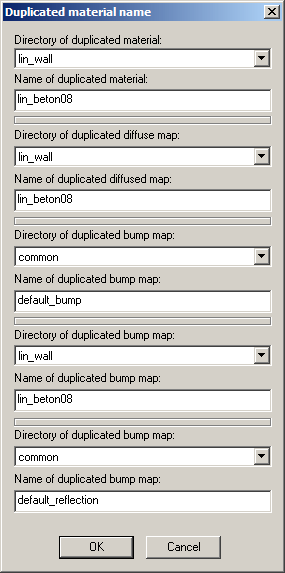
Sometimes you maybe would like just to copy an existing material. Clone
Mat. button may come in handy. You just must have a directory already
created, in which you want copy a material. In dialog window
is just necessary to set new 'Name of duplicated
material'. |
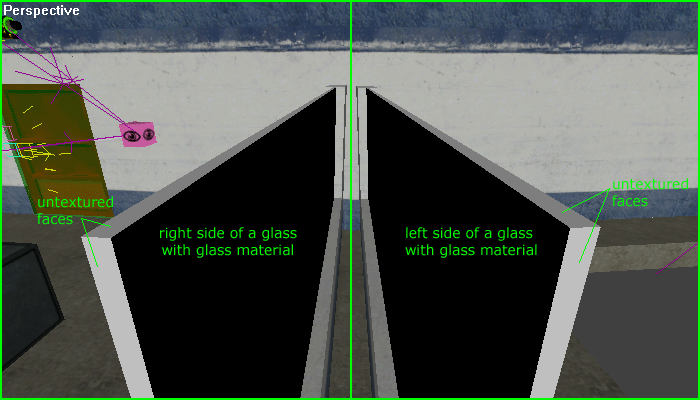
| Set glass brush with these parameters on: Corona No
Clip, No Shadows, See Through.
You can create a glass with no thickness, just set DOUBLE_SIDED = TRUE;
and apply material only on one side of a brush. |
5.3
Advanced Materials /new to
the top
5.3.1
Breakable glass /new
Here comes major advantage of Materials.
You can use two materials with same textures, but with different settings.
Like unbreakable and breakable glass. Breakable glass is defined by a
additional script in the end of material. Just use example
from examples directory, or add marked part of the material script
into yours. Apply breakable glass material only
on two opposing (what-you-see) sides
of a brush if set GLASS_3D = TRUE;.
If from any reason you need more simple breakable glass, than set DOUBLE_SIDED
= TRUE; and apply this glass material only
on one side of a glass brush. Apply breakable glass material only
on flat surfaces.
#Basic Material Properties
{
AMBIENT_INTENSITY = 1.0;
SELF_ILLUMINATION = 0, 0, 0;
LIGHT_ILLUMINATION = FALSE;
DIFFUSE_MAP = lin_windows\lin_glass10_destroyable;
BUMP_MAP = common\default_bump;
BUMP_SCALE = 1.0;
SPECULAR_INTENSITY = 0.0;
SPECULAR_POWER = 1.0;
GLOSS_MAP = lin_windows\lin_glass10Asmall;
REFLECTION_MAP = lin_reflections\lin_cube_hall2top;
REFLECTION_INTENSITY = 0.9;
LIGHT_REFLECTION = FALSE;
MATERIAL_TYPE = glass;
DOUBLE_SIDED =
FALSE;
GLASS = TRUE;
GLASS_3D = TRUE;
GLASS_MIN_FACE_SIZE
= 5;
GLASS_FRAGMENT_RATIO
= 0.65;
GLASS_FRAGMENT_MIN_DIAMETER
= 5;
GLASS_FRAGMENT_MIN_SIZE
= 200;
GLASS_FRAGMENT_DIVIDER
= 2.5;
GLASS_FRAGMENT_COUNT
= 18;
GLASS_SHARD_MIN_SIZE
= 1;
GLASS_SHARD_GRAVITY
= 400;
GLASS_SHARD_DAMPENING
= 0.01;
GLASS_SHARD_LIFETIME
= 8;
GLASS_BROKEN_MAP
= lin_windows\lin_clear_broken;
} |
if TRUE, material is visible from the other
side of a textured face
turns on breakable glass (TRUE/FALSE)
creates thickness of a glass
It's not recommended to modify these parameters.
how long glass shards remanins (in seconds)
optional, delete this line if you want
clean glass after breaking
|
|
Set water surface brush with these parameters on: Corona
No Clip, Player No Clip, No Shadows.
If you want water surface looking smooth and liquid, u have to use as
much tesselated mesh as possible. Check out your 'WorldStudio\Brushes
\brushes_water_surface\..' direcotry for appropriate meshes. |
5.3.2
Water /new to the top
Creating dynamic water surface is also matter of material's settings.
Just use example, or add
marked part of the material script into yours.
#Basic Material Properties
{
AMBIENT_INTENSITY = 1.0;
SELF_ILLUMINATION = 0, 0, 0;
LIGHT_ILLUMINATION = FALSE;
DIFFUSE_MAP = lin_misc\lin_water;
BUMP_MAP = common\default_bump;
BUMP_SCALE = 1.0;
SPECULAR_INTENSITY = 0.0;
SPECULAR_POWER = 1.0;
GLOSS_MAP = common\default_gloss;
REFLECTION_MAP = lin_reflections\lin_cube_tutorial;
REFLECTION_INTENSITY = 0.8;
LIGHT_REFLECTION = TRUE;
MATERIAL_TYPE = water;
LIQUID_SURFACE
= TRUE;
LIQUID_SURFACE_NORMAL_BIAS
= 1;
LIQUID_SURFACE_TENSION
= 8;
LIQUID_SURFACE_DAMPENING
= 0.03;
LIQUID_SURFACE_SPEED
= 4.2;
LIQUID_SURFACE_MOTION
= 1;
LIQUID_SURFACE_REFRACTION
= FALSE;
TRANSPARENT_SORT_OFFSET
= 10000;
} |
enables/disables dynamic
water surface
It's not recommended
to modify these parameters.
Refraction is disabled in Chaser.
optional, use only
if problems with other transparent materials encounters. Else remove/do
not add this line. |
It's good to have as much tesselated mesh as possible if you want water
surface smooth and liquid-look like. You can find few meshes exported
from 3DStudio Max in WorldStudio\Brushes\brushes_water_surface\
directory we used in Chaser.
To create a brush that will represent water surface, select one in
Prefabs and place it in your map same way as normal brush with 'CTRL+LMB'.
Set its parameters to See Through, Player No Clip,
Corona No Clip and No Shadows. Do not
set Bullet No Clip so the bullets can hit
the water surface.
Now while brush is still selected of course, open Material Browser and
select a material u prefer and press 'Map All'
button. (eg. lin_misc\lin_water_tutorial,
or snp_misc2\snp_WATER_chst02 - same water
material as in Final Strike map). If you are
creating pool not very deep, you're done now, if you want player to swim
in it, follow next steps.
Create a simple box with sizes of your water surface brush. It will represent
water mass. Set its parameters to See Through, Corona
No Clip, Bullet No Clip and No Shadows. Add entity Enviroment
from 'misc' directory and create a link from
this box brush to Enviroment. Edit its parameters,
change enviroment_type = WATER. That's it.
If you link Enviroment entity to target_position,
and set active_power (from -1.0 to 1.0 max)
you will create a water stream. Note, this link shows only an angle of
a stream, not the direction, direction is defined with positive or negative
number in active_power parameter. |
| to toggle Decals mode, press 'D' |
5.4 Decals /new
to the top
If you want to add some special marks on the walls or floor, maybe some
blood stains or some sign, decals are very convenient for this. You can
use as a decals any texture, but not all will fit your needs (because
of color blendings of source (wall) texture and colors of a decal texture).
To toggle 'Decals mode' press 'D'.
Your cursor will change its shape. Select a texture in Material browser
you would like to put on some surface. While you're in Decals mode, you
cannot delete any brush or texture from a face. Press 'CTRL+LMB'
to apply decal on the surface. Decal will appear selected (yellow rectangle
covering it) with its center exactly at the point you have clicked. Keep
decal selected, open Material Browser and
select another texture. Now you can apply new decal somewhere else, but
it will inherit size of a previous decal. You can change a color Note,
if you select one decal, others have brighter rectangle too, so you can
find maybe decals which you cannot actualy see because of unfit color
blending (Mostly when u set color of decal some bright color, white will
become invisible at all)Unselect decal with 'Esc'
key.
If you want to have in your map white decals, texture must be 32 bit with
alpha channel. |
| Press 'Alt+N' to flip normals of a selected brush/brushes |
5.5
Creating sky /new to the top
Actually you can create an enviroment sky from any brush u like, eg.
drag box pres 'Alt+N' to flip its normals
(so box turns inside-out, but carefull, do not flip meshes exported from
3D Studio Max), check parameter 'Enviroment'.
It is important how high you place an enviroment sky from zero position
(in Left or Front View). There are few meshes exported from 3D Studio
Max which were used in Chaser in Prefabs/Brushes
mapped with materials.
(Simple example: create a box of size 512x512x512 points. Apply a materials
on every surface of that box and press 'Alt+N'
to flip normals. Set parameters No Shadows,
Player No Clip and Enviroment.) |
| Press 'CTRL+T' to create a terrain
Heightmap texture must be a grayscale (8-bit) .tga.
Press 'Shift+T' to change your existing terrain
Save very often
Press "Alt+S' to smooth your terrain globaly (after using one of
terrain modifier tools) |
6. Outdoor enviroment
/new to the top
6.1
Creating landscape terrain /new
Creating terrain in Worldstudio is again very simple and easy, like everything
in Worldstudio of course. Press 'CTRL+T' to
bring up dialog window for terrain parameters. Browse for a grayscale
.tga texture (heightmap, white is the highest point, black the lowest.
Create one in Photoshop or any other software you like, size 256x256 px
should be enough. Set dimensions of your terrain and its' height. Terrain
may be dividied into number of brushes (segments) in "Terrain
segmentation" (by default 8x8 segments). How tesselated terrain
will be is set by "Terrain Detail"
(can cause problems when creating very large terrain with very high tesselation),
recommended is number 64 on small terrains, 128 on bigger terrains (bigger
means about 4096x4096). Press OK and terrain will be created in the center
of your map as a group of segments. Now you can apply material as on other
faces in WorldStudio (do not apply a water material, that doesn't work,
glass material is working, even breakable, but can cause problems when
shooting J).
Is you want change your terrain, you don't have to alter your heightmap.
Press 'Shift+T' to bring up 'Terrain
Modifier' and select your tool: Raise
- raises a area under your cursor, Noise -
adds some random roughness, Smooth - smooths
J, Flatten
- flattens area under your cursor, Decorate
- generates selected brush randomly on terrain.
If some breaks occur between segments of your terrain, press 'Alt+S'
to clean them out. I think all tools and their usage are clear, except
Decorate, let's take a closer look at it.
Let's assume you have some huge outdoor and you want to add some trees
or bushes somewhere on it. Let's say you have one created, place it on
some place in your map on zero position in Left (or Front) View. This
sets how high from the terrain brush will be generated. Set parameters
of your brush ('B' key) if needed (eg if you
are going to generate some grass, set Player No Clip
and No Shadows first). Keep brush selected,
press 'Shift+T', select Decorate,
set Radius = 512 and Density
= 4 (for example). You may note your cursor in Perspective
View has a green circle around it. On one LMB click 4 brushes will
be generated on top of the terrain within this radius. Save often! |
| |
6.2 Fog /new
Just place a fog (misc
directory) entity into the map, set parameters, update entities into map
('CTRL+SHIFT+F7') and run it. Fog should be
there
You can choose one of tho types of fog in Fog
entity. LINEAR fog doubles number of polygons
visible, so your frames per seconds may drop down, in some very complex
areas. But advantage of LINEAR fog is, every
polygons which are not visible because of a fog are clipped out (it's
recommended to create a sky enviroment mapped with texture of a same color
as fog is set). LINEAR fog uses
range parameter (in points, sets how far you can see).
Second type of a fog is EXPONENTIAL. Range
parameter is ignored when this type of a fog is selected, density
is used instead (use rather low numbers, around 0.25 - 1.5). It's recommended
to use rather EXPONENTIAL fog instead of LINEAR,
it's faster (EXPONENTIONAL fog is not clipping
polygons, but also it is not doubling number of them).
And there is also the third type of a fog, a brush
fog. Unlike previous two ones, brush fog is created of a brush, not a
as a fog entity. Create a brush that will
represent a fog zone, can be a box for example. Now apply a fog material
(lin_misc\lin_fog_tutorial) on that side of
that brush which player will enter into. At least one visibility_eye
should see that textured side. If you are willing to create just a ground
fog, apply only on top side of a brush. With this type of a fog you can
add some "atmosfear" (ground covered with fog, or you can fill
a room with black brush fog, so it's darker than other places (looks better
than local ambient_light). Parameters are
defined in material, you can set color, density,
or enable/disable fog effect. |
| |
... |
| for loading definition file example click here.
example loading.psd
needed files: mapname.cew, mapname.tga, mapname_loading.tga,
mapname_loading.def, mapname.STRULEZ (if ShocTroops map)
|
9. Loading screen /new
to the top
Very easy. Create a screenshot or whatever you want to appear during
loadscreen. Set its size at 512x512x24bit.
Save it into Maps directory as "mapname_loading.tga"
(if your mapname is st_badplace.cew, you should
name your loading screen texture st_badplace_loading.tga).
Now use example_loading.txt.
Rename into MAPNAME_loading (same like your
loading texture name) and save as MAPNAME_loading.def
in Maps directory.
To create a icon image, just create another .tga image (size 128x128x24bit)
and name it MAPNAME.tga. Save in Maps
directory too. So don't forget to include all these files (mapname.cew
file - the map itself, mapname.STRULEZ file - rules for
ShockTroops, if any, mapname_loading.tga file and mapname_loading.def
file for loading screen and mapname.tga - for map icon
in menu).
There is also in examples directory a .psd
file and here is a guide how to create same loading screen as in Chaser.
- desaturate a screenshot (CTRL+SHIFT+U)
- duplicate (CTRL+J)and apply Filter>Radial blur: amount 20, blur
method zoom, quality good
- original not filtered screenshot move on top and set Opacity to 50%,
set Layer blending: lighten
- black stripes with chaser title on top should be on top
- merge layers (CTRL+E)
- set image size to 512x512
- save as MAPNAME_loading.tga
|
| |
|
| |
© Cauldron Ltd.
2003 |
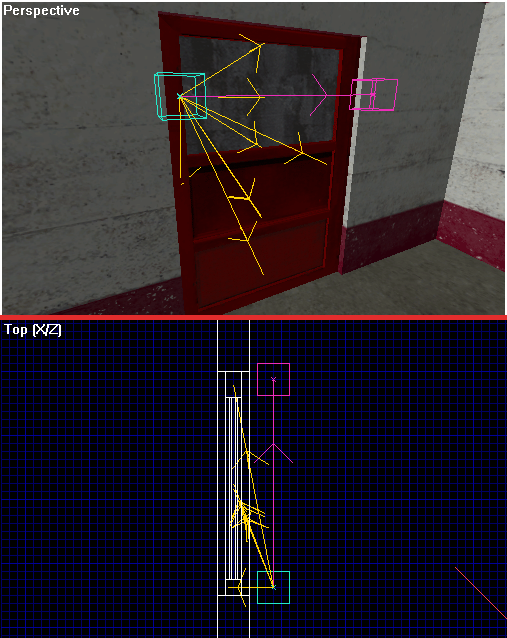
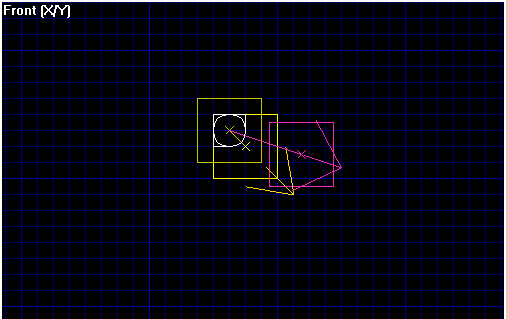 .
Now select corona and link it (Alt+E)
with target_position. This will cause overbright
effect, corona will appear stronger when standing
in front of the light (in direction of this link) compared when standing on
the side of the light. How bright the corona will
be is set by overbright_scale parameter in coronas
parameters.
.
Now select corona and link it (Alt+E)
with target_position. This will cause overbright
effect, corona will appear stronger when standing
in front of the light (in direction of this link) compared when standing on
the side of the light. How bright the corona will
be is set by overbright_scale parameter in coronas
parameters.